Quadrant Systems
Receipt Accounting System
ODBC Setup Instructions
These instructions assume you have installed the RASWIN program on a
workstation already using the RASWIN SETUP program
and need to create the ODBC connection to the database. The setup
program has no way to do this automatically as it has no way to know the
name of your servers and other network information.
If you are just updating an existing installation the
existing ODBC connection should already be present and would not
normally need to be
recreated.
REGISTER # Setting
NOTE: The ODBC must be set up before the
REGSET_NEW.EXE program
can verify the register number and update the database with
the application register number.
Each workstation must have a unique
REGISTER number. This is established by the presence of a
small
'trigger' file on
each workstation. The best way to create the file is to use the
Register Number
Setting Utility supplied by Quadrant Systems. This can be found in
the
following location:
c:\program
files (x86)\quadrant\raswin\extra_utilities\regset_new.exe
The trigger file name must be
c:\program files (x86)\quadrant\raswin\REG.xxx
(where
xxx is the 3-digit register number.) For register
#2, the
file would be
called
reg.002, and so on for each additional register.
Note that
the
file extension (the part after the period) is the the 3 digit
register number.
The leading zeros in the file extension MUST be present ...
reg.1 is not the same as
reg.001.
When the RASWIN program starts it searches for the REG file ...
starting with
reg.001
and progressing to
reg.999 in order. As soon as it finds the FRIST
file that matches it will stop searching for additional REG.xxx files and assume
that
is the assigned register #.
Having multiple registers with the same register
number can lead to many difficult or impossible to solve problems
with conflicting
receipt numbers, date assignments, settings, etc., so be sure to
check your register # carefully and don't
duplicate register numbers across machines.
RASWIN double checks the database at startup to make sure there are
no other workstations using
the same register number. If it finds another workstation has been
configured to us
the same register # it will terminate the program until the
discrepancy is resolved.
This checking is based on the unique Windows Workstation ID assigned
to the computers connected to the database.
ODBC Settings
There is one ODBC 'system' setting required.
-
This should point to the Quadrant RASWINSQL database on the
SQL server.
-
The ODBC setting must be setup using SQL Server
authentication.
-
The user id/password must exist in the SQL 'master'
database before
you can create the ODBC link to it. The standard
RASWINSQL creation script
will creates the needed user (REG001,
which is used for ALL workstations, regardless of which
register number is assigned to them).
-
The steps for setting up the ODBC are listed below:
-
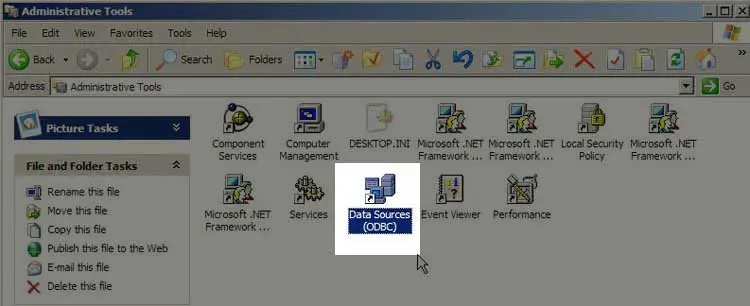
Using the Windows Control Panel, start the
ODBC Administrator tool.
IMPORTANT! If you are on a 64 machine,
you MUST use the 32 bit ODBC setup. This
is located at
c:\windows\syswow64\odbcad32.exe.
-
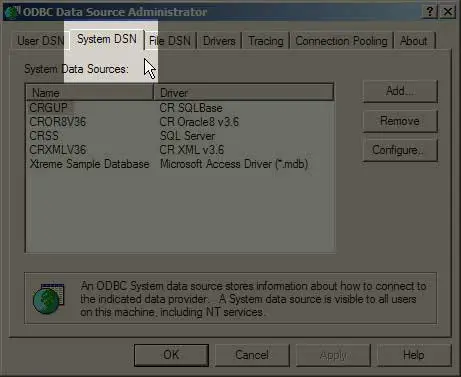
Click on the SYSTEM tab.
-
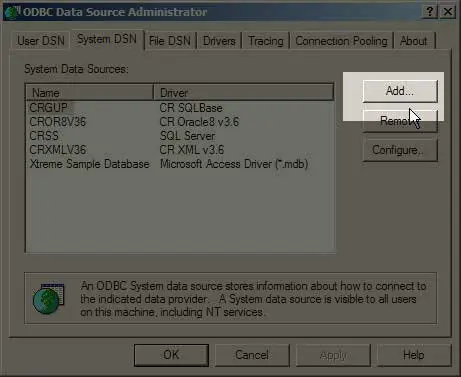
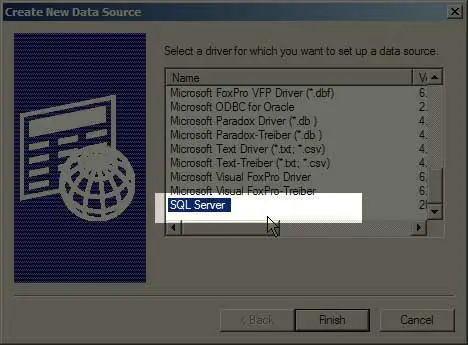
Click on the ADD button.
-
Press "S" or scroll towards the bottom of
the list to
locate the "SQL Server" entry in the list of
database options
available on your system. Make sure SQL
Server is highlighted.
-
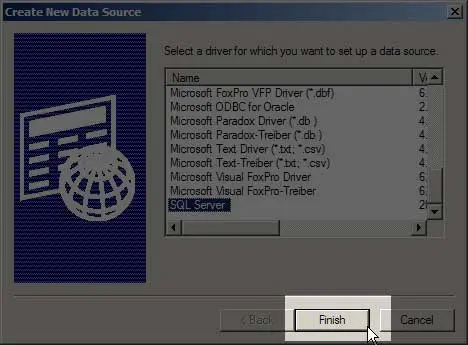
Click on the FINISH button. Microsoft has an
odd way
of naming these buttons. You are not
finished yet.
-
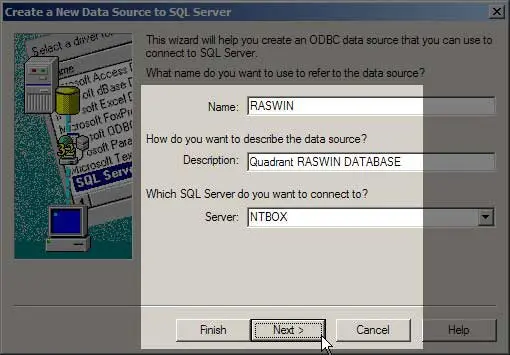
Enter the values shown below in the text
boxes
on the entry screen. The only one you will
have to
modify is the name of the server. This can
be a server
name (such as the one shown here) or an IP
address (if
that is how you refer to servers at your
location.)
Click on NEXT after you enter the 3 values.
-
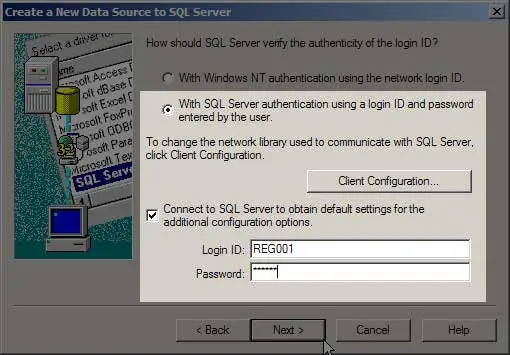
Click on the 2nd button ("With SQL Server
Authentication")
and then in the LOGIN ID and PASSWORD Boxes
enter the
values REG001 and [CONTACT QUADRANT SYSTEMS FOR PASSWORD]. Both
the USER ID
and password are the same for ALL
registers, and ALL DSN user ID values are
set to REG001 for the login regardless
which register # is assigned.
Once these values are entered, click on the
NEXT button.
-
If a connection is made there will be
a very short pause (two or three seconds) and you
will then see the screen below.
 If the connection is not established
the delay will be quite a bit longer (30 to
60 seconds)
and an error message will appear telling
you it could not connect for a variety of
reasons (couldn't find
the specified server, user not valid for
that database, etc.)
If this happens, use the BACK button to
check your entries on
the previous screens.
If the connection is not established
the delay will be quite a bit longer (30 to
60 seconds)
and an error message will appear telling
you it could not connect for a variety of
reasons (couldn't find
the specified server, user not valid for
that database, etc.)
If this happens, use the BACK button to
check your entries on
the previous screens.
If you see RASWINSQL in the
top box, you have connected
successfully. Click on the NEXT
button to continue.
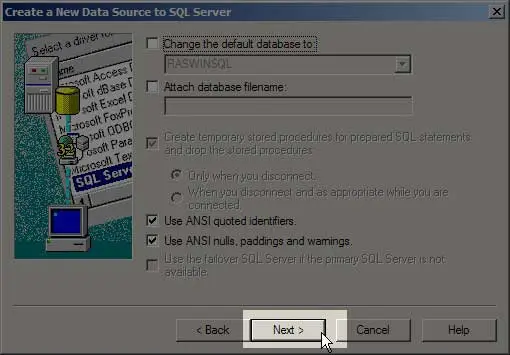
-
On this screen, just click on the FINISH
button to continue.
Again, Microsoft is a bit optimistic, but
they are closer.
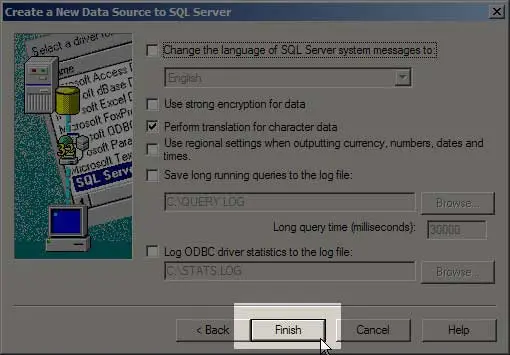
-
Click on the Test Data Source button to
verify all connection
settings are correct.

-
You will the the OK button confirming the
test worked
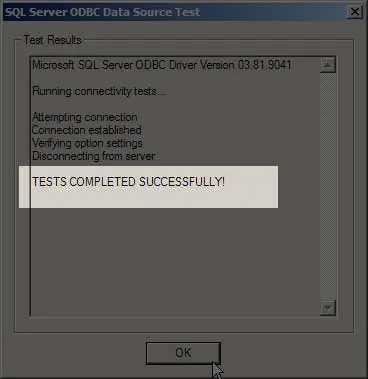
-
You will see the previous screen again,
where you click OK to FINISH. The guys are
billionaires,
so who are we to question
that they chose FINISH to go the NEXT screen
and OK to mean
FINISH, and START to shutdown your computer?
The MUST
just be a lot smarter than us to have
figured this out!
-
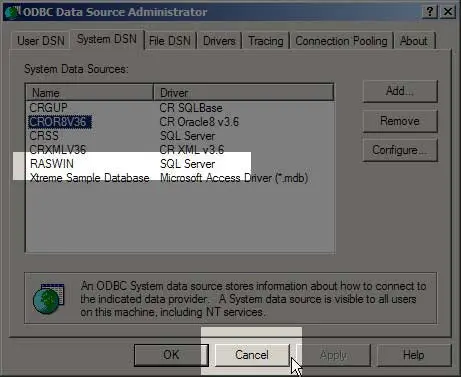
After pressing OK, you will see new ODBC
link in your
list of System DSNs. To prolong the
"Windows" experience
Microsoft makes you press OK one more time
to FINISH
the ODBC setup function. Then you can close
the ODBC setup
window completely.