Section 6
Inquiries
The inquiry function allows you to review data that has already
been processed. Select
Inquiry (F-9 button-Binoculars icon)
from the RASWIN Main Menu.
The following screen will appear.

You can then enter the criteria for your search, such as a
TRAN_CODE,
ACCOUNT#,
PAYER_NAME,
FEE_AMOUNT,
or a combination of field values.
Additionally, you can indicate a range of dates, items for a
specific cashier, and all or one departments. The
available fields are shown
on the screen. By default, the date range for the search
is from the current date to a date 45 days in the past.
You can override these values by clicking on the calendar
drop down boxes and selecting alternate dates. Note that
you can select whether to use the
accounting_Date
or the
calendar_date of the transactions.
Keep in mind that an wide date range may result in a long query if there
are many rows.
By default, the maximum number of rows returned is
500. This can
be changed by adjusting the
miscparms table value
INQUIRY-MAX-RECORDS.
Depending on whether you are searching for individual line items
or payments you can use the drop down list at the top left of the
screen to indicate which field you want to search for.
For a DETAILS search, the list will include these options:

For a Payments search, the list will include these options:

After selecting the search field, enter the search criteria in
the box to the right of the drop down list, for example, a
TRAN_CODE,
as shown below:

To search DETAILS or PAYMENTS using the
RCPT_STATUS
field, you can use these values:
2 = a completed receipt.
99 = a voided receipt.
If there are no other search criteria (see below) click on
green SEARCH button, or press F1. Any matching entries will
be displayed in the grid at the bottom of the screen:

For the amount field you can enter a specific amount, such as
100.007, or use the
< or
> signs to indicate
amounts greater than or less than a specific
amount , e.g.,
>100000.
As you enter the criteria the program will automatically build the
appropriate SQL search.

Note that in this example, both a
TRAN_CODE and an
AMOUNT were
used for the search.
If you want to change the selection criteria just enter new values,
or use the
CLEAR ALL 3 VALUES
button or
ALT-C to reset everything to
blank values.
If you want to reprint a receipt once you have displayed it, click
on that row in the displayed entries which will cause the
Print Receipt f-10 button to
appear, and then click the
Print Receipt button or press
f-10.
Helpful Search Notes:
- The program will automatically add a trailing wildcard (%) sign character
to the first two search fields. If you want to look for matching values
within a field, you can add additional % wildcards as leading or embedded
values. For example, if you want to search
for all matching TOMs, your search criteria might be
%TOM%. This would
find
JONES, TOM and
TOM JONES.
- By default is displayed with the most recent transactions or payments
at the top of the grid. However, you can re-order the sort by any of
the column by simply clicking on the row title of the column you want
to sort by. Clicking on the field name at the top of the list will
reverse the sort.
- You can group the grid display by any of the column names by dragging
the column name title to the gray area just above the column titles. For
example, a group by name display might look like this:

-
When you are searching for an amount, the program
will look at more than one field for matching values.
For a DETAILS search, this will include the
FEE AMOUNT
and TOTAL DUE
on the receipt.
For a PAYMENTS search, this will include the
PAYMENT AMOUNT,
TOTAL DUE,
and TOTAL TENDERED.
- You can send the results of a query to the default windows printer,
or if your network is set to prompt for a printer you can use
the standard printer dialog to set a different printer, or
print them to a PDF file if that is available on your system. By default,
the report will be printed in landscape mode due to the width of the
data.
Printing to a PDF file is a good way to provide a quick
report for another department or user.
-
You can save the grid data to a CSV file which can then
be imported to EXCEL (or OpenOffice, Libre Office, etc).
The following dialog will be displayed when the Save
button is pressed.
A reminder about how to format the spreadsheet so the
columns are all automatically resized to fit your data will
be shown.

- When the SEARCH is executed the
SQL query used is copied to the Windows Clipboard.
If you want to see the query statement
click on the SHOW SQL STATEMENT
button. This will open your default text editor (typically
Windows NOTEPAD), and display the text of the query. For example:
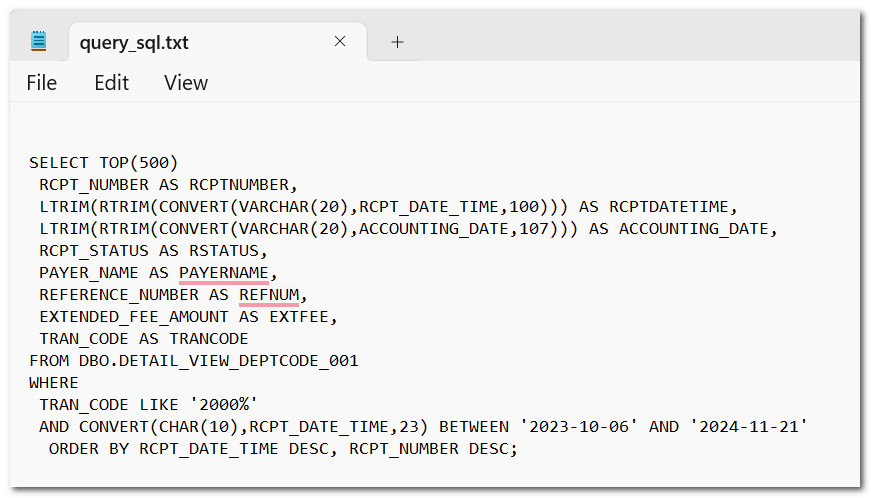 You can use this as a model for different or
more complicated queries. Spelling and correrct
SQL syntax counts!
You can use this as a model for different or
more complicated queries. Spelling and correrct
SQL syntax counts!
Keep in mind that the program will replace this text each
time a new query is executed.
The DETAILS query is based on the
DETAIL_VIEW_DEPTCODE view.
The PAYMENTS query is based on the
PAYMENTS_VIEW_DEPTCODE view.