Section 11
Pole Display Messages
The Pole Display Messages Table contains the text you want to
display on the
customer display at various points throughout the receipting
process. These can
include a greeting, such as
Hello. How can I help you?
and detail messages about the transaction itself, such as the
item
description, fee amount, total due, change due, etc.
Each such message is customizable by you to say what you want.
The pole display
contains two lines of 20 characters each.
At various points during the processing steps, the program
automatically searches
for and displays specific messages based on where you are in
the transaction cycle.
For example, while the system is sitting at the main
receipting screen, waiting for
you to start a customer receipt, the system will display the
GREETING messages.
Once you have started a receipt, it will display the
LINE-ITEM messages, and when
you are done it will display the
CHANGE-DUE messages. During most other
activities,
such as end of day reporting and table maintenance, the system
will display the
REPORTING messages.
Because messages can be displayed on two lines, there are two
records available
each group, e.g., GREETING-1, and GREETING-2.
-
MESSAGE_KEY-1
MESSAGE_KEY-2
This is the message group that identifies the classes
of messages to be
displayed. The valid group names are:
LOGIN
GREETING
LINE-ITEM
TOTAL-DUE
REPORTING
CLOSED
The association between the specific set of messages
to be displayed and the
area of the program being run has been coded to
provide a meaningful message to
the customer as to the status of the register (e.g,
during inquiry and
reporting functions, the message group used will be
REPORTING). It is not
possible for the end user to modify the specific group
of messages to be
displayed at any point in the process, but the
specific message text to be
displayed is under your control at all times.
-
MESSAGE_TEXT-1
MESSAGE_TEXT-2
The pole display unit has two lines of 20 characters
each that are used to
convey information to the customer. The text that
appears on these lines is
defined initially to provide helpful information to
the customer such as the
total due and change due during the receipting steps.
In addition, you can
tailor the messages to display other text, such as
your location name, a
holiday greeting, etc., as your needs dictate.
Here's an example of how you might set up the messages
for a typical
installation:
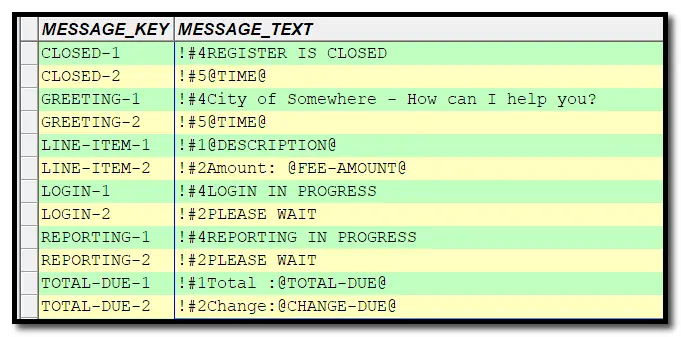 Note that some of the lines have plain text, and
others have variables that
you can use to cause the program to substitute data
values into the displayed
text. These include:
Note that some of the lines have plain text, and
others have variables that
you can use to cause the program to substitute data
values into the displayed
text. These include:
@DATE@
@TIME@
@DESCRIPTION@
@FEE-AMOUNT@
@TOTAL-DUE@
@CHANGE-DUE@
When the messages are created and sent to the pole
display, the program
substitutes the appropriate data value for the special
key words noted above.
All other text is sent as it is found in the table.
IMPORTANT NOTE: The pole display responds to the first
three characters of the
message text in order to determine which line to
display the text on, and for
two other special purposes (time and scrolling). These
rules are very simple:
!#1 - displays up to
20 characters on line #1.
!#2 -- displays up to
20 characters on line #2.
!#4 -- scrolls up to
45 characters on line #1. Line #2 cannot be
scrolled.
!#5 -- displays the
current time on line #2.
If this option is used, only the time can be displayed
on the 2nd line, e.g.,
the setting for line #2 must be:
!#5@TIME@
The pole display will show the clock and automatically
update the time display
without the computer having to resend the updated time
repeatedly.
The RASWIN program has special logic to prevent use of other
control code
rules that could cause the pole display to operate
incorrectly.
Other settings
In addition to the specific pole messages to be displayed,
there are two
MISCPARMS that must be set up for each
workstation which will have a pole display unit attached to
it. These tell the
system how the display is connected, and whether it is active
or not. These can be
found in the
HARDWARE options settings table.
The program will initially create the entries automatically
using the default
values described below. Note that the ACTIVE setting default
is
N, so you will
need to change it to
Y to cause the pole messages to
display.
Here's an example of the settings for register #2:

Note that the key values are preceded by the register number ,
in
this example,
002. This means that these settings
apply
only to
register #2.
The
xxx-pole-display-ACTIVE setting tells
the
program
it should attempt to send messages to the pole display. If set
to
N the program will not attempt to send
any
messages at all. By
default, the setting is
N, so you will need to change this to
Y to activate the pole display if you
have one connected.
The
xxx-pole-display-SETTINGS value
controls
the
specific configuration of the serial port, including the COM
port
#, speed, parity,
data bits, and stop bits. The normal setting is
COM1:9600,N,8,1 and this will be the
configuration of the pole
display out of the box. If your pole display requires
alternate
settings, such as
a different COM port or bit rate, you will need to adjust the
xxx-pole-display-SETTINGS value to
match
your hardware
configuration.