Section 11
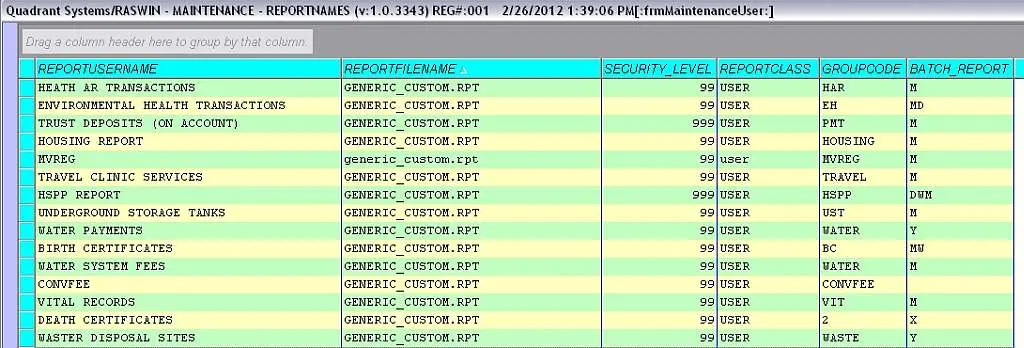
Report Names Table
The report names defines the report file names that will
appear on
your "Crystal
Reports" menu. You can adjust the names the user will see,
control
the order in
which they appear and set a security level required to view
each
report.
Each field in the table is listed, along with a short
description,
below:
-
REPORTUSERNAME
This is the name of the report the user will see on
the
Reports/Crystal Reports
sub menu. It should describe the report in sufficient
detail
to permit them to
select the correct report.
Normally the reports are listed in alphabetical order,
but
if you want them to
appear in an alternate order, place a numeric value at
the
start of the
reportusername field,
for
example, instead of
JOURNAL REPORT, use
001-JOURNAL REPORT to cause
this to be the first item
listed.
-
REPORTFILENAME
This is the file name for the Crystal Reports report
file.
It must be a file
name that actually exists, and of course, the report
created
with Crystal must
be tested to verify that it gives you the results you
expect.
You can create your own reports with Crystal if you
know how to do this, and add them to the menu so they
will be easy to run. The normal location for all
report files is in the
C:\program
files (x86)\quadrant\raswin\REPORTS
directory. This can be modified so that the file
location is in another location, via a misc parameter,
REPORT-FILE-LOCATION. If
you move the reports to another location, the setting
in the
MISC
PARMS table
must be valid or the program will not be able to
locate the reports.
-
SECURITY_LEVEL
You can set the security level
required to access a report using
this field. If the currently logged in cashier does
not have a
security level equal to or greater than the
level specified in this field, they won't be able to
run the report.
IMPORTANT:
If you don't put a value here, it will default to
0.
You can remove reports you don't want to see on the
reports
select menu either by deleting them from the table, or
by setting the security level
to
a value of 999999
-
REPORTCLASS
This field is required. You can enter a category
("class")
for the report in
this field. Examples are
TABLES or
TRANSACTIONS, or
USER.. This
permits you to group the reports by the class name you
assign so that, for
example, all table listings can be grouped in the
selection
list to
differentiate them from transaction related reports.
By
default, when the
reports list is displayed on the initial report
selection
screen, reports of
type
USER are the only ones
that are displayed.
-
GROUPCODE
This field is optional and serves a special purpose.
RASWIN permits you to define a
GROUPCODE in
the
trancodes table field called
SHORT_DESCRIPTION . This code
causes transactions of a specified
groupcode to be selected on a
special custom report. This report is set up in such a
way that the specific date range can be selected by
you each time the report runs. The format of the
report is preset to contain a specific field
arrangement that most users find satisfactory for most
purposes.
The relationship between the
GROUPCODE in the
REPORT NAMES TABLE and
the
SHORT_DESCRIPTION in
the
trancodes
TABLE is as follows.
The
GROUPCODE can be any string of
characters you want to use to identify transactions
that should be displayed on the custom report. For
example, suppose you want to create a report
containing all transactions from the Water Department.
You could use a code such as
WATER for the Water
Department
groupcode.
Likewise, you might use
LIB
for Library. In the
REPORT NAMES
TABLE you would set up the entry for the
Water System Fees
as shown below:
In the
TRANCODES TABLE,
SHORT_DESCRIPTION
field, you
need to put the same group
code, except that it must have a forward slash (
/)
character BEFORE and AFTER the code. RASWIN
will automatically add a leading and trailing
/)
if it finds entries in the
trancodes table without them. In this example, the
code would be entered in the
SHORT_DESCRIPTION
field as
/WATER/. The reason
you must use the slash
character is that the
short
description field
may have more than one
group
code. If you had
another report, for example, for
NSF
checks, the
GROUPCODE might be
NSF.
You might have several departments, (e.g., WATER, PD,
REC,
FIN, etc.) and you might have a separate NSF trancode
for
each one. By using
the
/ delimiter character,
you could could track
NSF fees for each department putting
/WATER/NSF/ in
the
short description field
for the police
department report, and
/REC/NSF/ for
the
Recreation department. You could then get one report
showing
all WATER fees
(including NSF's), and another showing all NSF fees,
regardless of which
department code was associated with it. Of course you
would
need to create an
NSF report entry, which requires nothing more than
setting
up another entry in
the
REPORT NAMES TABLE that
has an appropriate
title (such as
NSF FEES) and
a
group code of
NSF.
Note that the
REPORTFILENAME
is set to
GENERIC_CUSTOM.RPT and the
GROUPCODE is set to
WATER. The
GENERIC_CUSTOM.RPT file is a
special
report developed by Quadrant that accepts run time
parameters
when it is run. The parameters include the
GROUPCODE you have
assigned in
the
REPORT NAMES TABLE and
additional parameters you
select at run time when you actually request the
report.
These include the
Starting Date and Ending Date. These will be collected
via a
special screen when you run the report. If a group
code has
been defined
properly and the
REPORTFILENAME is
GENERIC_CUSTOM.RPT, the
report selection screen will display
as shown below
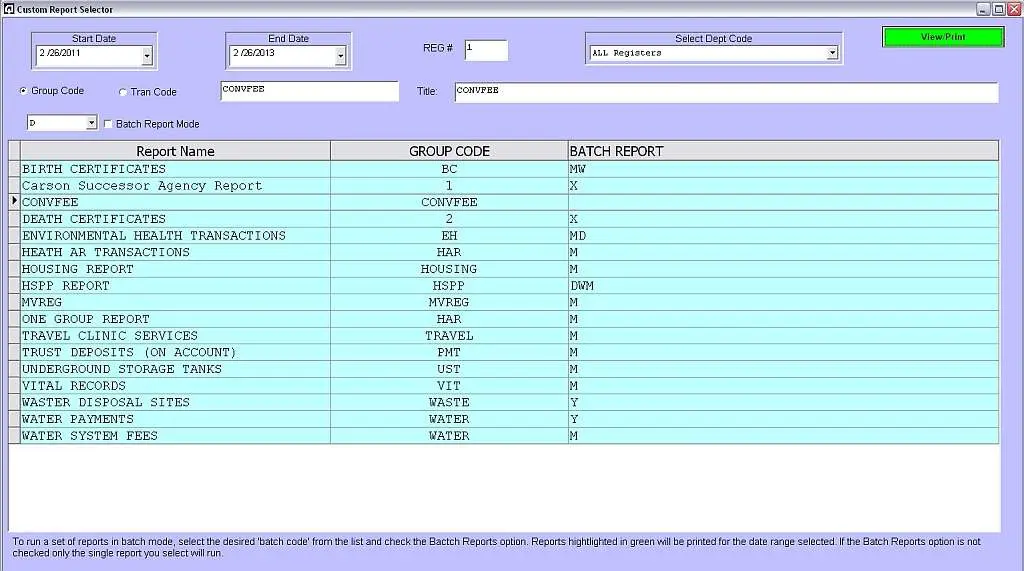
When you click on one of the report names shown in the
list
the program will fill in the selected group code and
report
name in the
boxes just above the selection grid. Note that the
group
code option
will automatically be checked.
By default, the date displayed in the Start and End
date
selection areas will
be the current ACCOUNTING DATE. You can adjust these
as
needed for your report.
When you are
done, click the VIEW/PRINT and the report will be
created
and displayed. From
there you can print it by clicking on the Print button
on
the screen.
There are additional options on the report selection
screen.
See
this link for further
information.
-
BATCH_REPORT
This field is applicable only for the reports that are
generated by the
GENERIC_CUSTOM.RPT report
template (see above).
You can define batch groups for each report. These
might
include
D for daily,
W for weekly,
M for monthly,
etc.
These are the most obvious values, however, the batch
code
can be
any letter , (
A-Z) or number
(
0-9),
Note that as in the example above, a single report can
be
assigned to multiple
batch codes, (such as D and W and M).
See
this link for further
information.