
Click for Index
- SCANKEY
This is the literal text SCANLINE- followed by the length of the scan line. For example, SCANLINE-22.
- TRAN_CODE
This is the literal text TRANCODE. It is there to help you remember that the first defined field is the Tran_Code. It is actually ignored by the program, so if it is not set to TRANCODE, there will not be any error.
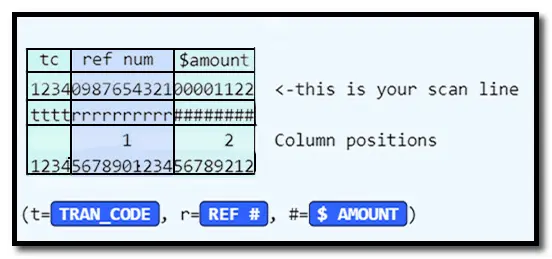
- TRAN_CODE_START
This is the starting position of the tran_code within the scan line. In our example, it would be 1, but the Tran_Code can be placed anywhere within the scan line if desired.
- TRAN_CODE_SIZE
This is the size of the Tran_Code. In our example, this value would be 4, but in the RASWIN program, the Tran_Code can be any size from 1 to 30 bytes.
- The next groups of parameters that are used to define the additional fields in a scan line. These are described here as F1, but there are actually five sets, labeled F1 through F5. They all work the same way. In most cases you will use only F1, F2, and F3 is used to define the amount field. F4 and F5 are currently not used for any purpose.
F1_NAME
This is whatever field name you wish to assign to this portion of the scan line. For example, it might be something like Account Number. This is for reference only.
F1_START
This tells the program where the field starts. In our example it would be 5, since the account number starts in column 5.
F1_SIZE
The size of the field. In our example 10 is the correct value.
F1_PROMPT
If you want the program to include some literal text before the actual data value extracted from the scan line, you can place it here. For example, you might wish the collected data value to read: ACCOUNT#:9876543210 instead of just the data value itself. If this were the case, you would put ACCOUNT#: in the prompt field. If you don't want any literal text prefix, leave this value blank.
F1_OUTSIZE
if you want the output value to be padded to the right with spaces beyond the size of the field value, specify this value here. For example, if the value was to include the prompt as described above, the value for this field would be the total size of the two portions of the output ('ACCOUNT#:', 9 bytes) + '9876543210' (10 bytes), or 19 total. If you wanted a space or two between this output value and the next field (if applicable) you could set the size of this field to 20 or 21.
At this point, you may be wondering how you might use more than one output field. Say for example, you wanted to scan 2 reference number fields from the scan line - such as a CUSTOMER NUMBER, and an INVOICE NUMBER. In your output line you want these fields to be shown as CUST#:1234567890 INVOICE#:9876543210
In the field one portion you would define the location for the customer number, and in the field 2 portion you would define the location for the invoice #. If you wanted these values in your output line as: INVOICE#:9876543210 CUST#:1234567890 you would reverse the field 1 and field 2 references.
As noted earlier, the amount field is defined in field #3. The starting position and size values for our example would be 15 and 8, respectively.