
Click for Index
The changes are presented with the most current items at the top of the list.

As the timer counts down, it will turn yellow when it reaches 30 seconds remaining.

Then red as it reaches 10 seconds.


Some of the Quadrant settings refer to 'standard' directories which have to be specified in the RASWIN tables (e.g., export options, graphics settings, etc.) These can sometimes be quite long and it's easy to make errors when entering or adjusting these settings. We have therefore setup 'short-cut' ways to specify these settings so that you can type a much shorter value and the program will expand it to the full path when needed. These are as follows:
| SHORTCUT | VALUE |
| [PATH-BMP-USER] | C:\PROGRAMDATA\QUADRANT\BMP\ |
| [PATH-EXPORT-USER] | C:\PROGRAMDATA\QUADRANT\EXPORT\ |
| [PATH-IMPORT-USER] | C:\PROGRAMDATA\QUADRANT\IMPORT\ |
| [PATH-PHOTO-ID-USER] | C:\PROGRAMDATA\QUADRANT\PHOTO_ID\ |
| [PATH-REPORT-USER] | C:\PROGRAMDATA\QUADRANT\REPORTS\ |
| [PATH-TEMP-USER] | C:\PROGRAMDATA\QUADRANT\TEMP\ |
| [PATH-BMP-QSI] | C:\PROGRAM FILES\QUADRANT\RASWIN\BMP\ |
| [PATH-PHOTO-ID-QSI] | C:\PROGRAM FILES\QUADRANT\RASWIN\PHOTO_ID\ |
| [PATH-QSI] | C:\PROGRAM FILES\QUADRANT\RASWIN\QSI\ |
| [PATH-REPORT-QSI] | C:\PROGRAM FILES\QUADRANT\RASWIN\REPORTS\ |
So, by way of example, combining this information with your export settings, instead of having to specify your export path as "C:\PROGRAMDATA\QUADRANT\EXPORT\" in the export options table, you can simply specify "[PATH-EXPORT-USER]"...much easier. If you wish to specify alternate locations for your export (e.g., a network path) then you can just use that instead...e.g., '\\some-server-name\some-directory\'. If you don't want to mess with any of this you can just leave your current settings alone and they will continue to work just fine.
Minor Change:
A new option is available for theCASH RECAP REPORT. In some receipt processing environments you may want to limit the ability of users in one department from running the CASH RECAP REPORT for any department other than their own department. A new MISCPARM setting allows you to specify the user security level required to select any department other than the department to which the user running the report is assigned.

By default, the value will be set to '999'. This is normally what you would
want in most cases. If the user level is at 998 below, they would be able
to
run the report for only their assigned department. If you want them to be
able
to run the report for other departments, set their security level to 999,
or
lower
the level of the CASH-RECAP-OVERRIDE-DEPARTMENT
setting to a lower level.
In cases where you have only one department in use, it does not matter what
the
setting is, because there is no way for the user to select an alternate
department
anyway.
The trailing backslash must be present. Do not include a file name...the program will automatically add that for you. The user must have rights to the specified directory for the file to be written properly. The same information will be written to both the local and network copies of the log file.
If you don't want to have a network log file created, set the value of the
SECURITY-NETWORK-LOGFILE-PATH
parameter to NONE
A few new features:
In earlier versions the program allowed 'simple' passwords with few restrictions. The only limits were that your password could not be 'PASSWORD' nor could it be the same as your user id. There was not minimum length required. At the request of several of our customers, we modified the program so you have the option of requiring more secure password ... by DEFAULT this option is turned off. However, as of this version if you want to have more complex passwords you can do so. This option can be activated by going to the SECURITY Options table and locating the record with a key value of:

If the value is set to NO it will not require 'complex' passwords. If it is set to YES you will need to set passwords that comply with the following restrictions:
Note: In order for the program to recognize 'complex' passwords you must go into the FILE-->Change User Password option and change your current password from whatever it is now, to a new value. ALL of the restrictions noted above will then apply from that point forward.
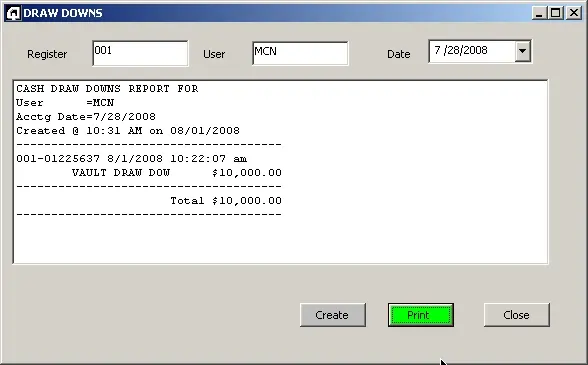
A new option is available for users who want to track 'draw downs' from the cash draw. Typically, these are used when you have a large amount of currency in the drawer and wish to move it out of the drawer to the vault ... either because there's just too much dollar value or there is simply too much 'bulk' and you are running short of space in the drawer. These draw downs basically operated similar to a 'Check Cashing' transaction ... the amount of cash the system thinks is in the drawer is reduced by the amount of the draw down. The total # of draw downs (and the details) will be shown on the cash recap at the end of day, and on a special new report available from the REPORTS MENU. To use this new feature, set up things as follows:
Create a new trancode called CASH DRAW DOWN. The specific trancode you use for this is not important, but we suggest something simple like DD . The program will look for the literal text CASH DRAW DOWN in the transaction description in order to trigger the special processing logic.

Create a payment method called DDOWN.

Note that you must set the METHOD_GROUP column to DRAW DOWN to get the item to appear in the detailed payments list which is part of the CASH RECAP report.

As noted earlier, there is a new report to document these items
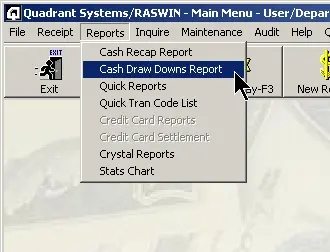
When you select this, the following screen will appear:
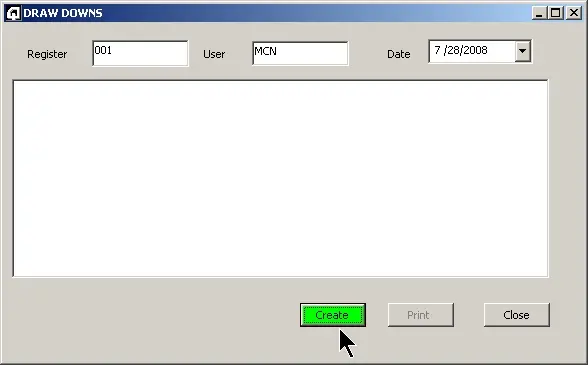
By default, the current register and cashier will be selected. You can change these as needed. Click on CREATE to generate the report, and PRINT to print it to the receipt printer.
More Good Stuff:
After many requests we have modified the inquiry function so that you can now enter multiple search criteria when doing your search. For example, a name AND and amount. In the older version inquiries were based strictly on a single search value. The ability to search on multiple values will be helpful for those situations where you have many customers who pay the same amounts (e.g., parking tickets, minimum amount for a utility bill, etc.) and you want to see that amount for specific customer names.
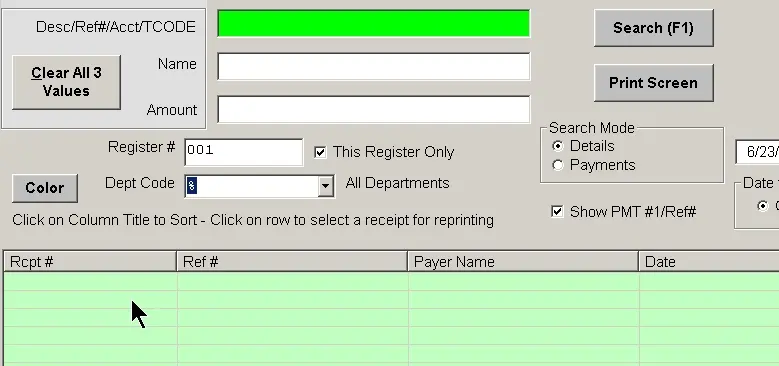
In older versions, as soon as you started keying a value in either
of
the three
fields at the top-left corner of the inquiry screen, the other
two
would automatically
clear. This made it impossible to query for more than one value.
Now,
entering data in one of the fields
does not automatically clear the others.
If want to do a new query with all new values,
you can click on the "Clear All 3 Values" button, or use the
keyboard
shortcut "Alt-C"
to clear them. After doing either of these options, the fields
will
clear at the cursor
will be placed in the first field so you can enter new values.
The CASH RECAP REPORT has been modified in a very minor way. In older versions, when you printed the detail transaction section of the report, the column widths could adjust in a variable fashion so that, depending on the size of some of the data fields, the column widths would vary. This has been fixed so that all the columns are the same width throughout the report. It makes scan the report for specific data fields a little bit easier. The program stores the column width values in the database in such a way that they can be changed if you need more or less room for a specific column. These are expressed as a percentage of the total width...see below:
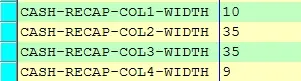
In the above example, the first column is defined as 10% of the total width of the page, the second two as 35% each, and the last as 9%. Generally speaking, the total of the 4 columns should be 100% or less, however, if they total to a different amount the program (actually your Internet browser) will make adjustments to cause it to still display correctly, just not exactly what you set.
You can now set the program so that if you want to enter a VOID REASON other than
those that are pre-defined in the database you can do so. To do
this
you must manually
create an entry in the SECURITY SETTINGS
table. The value in the first column should
be set to VOID-LIMIT-REASONS-TO-PRESETS
and the second column should be set to NO.

When this is done, the system will still drop down the list of pre-set reasons, but you can also type any reason you want in the reason field for the void.
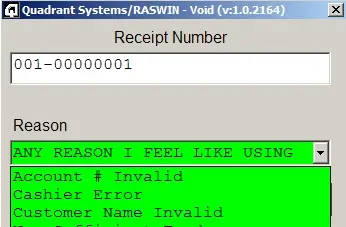
Note that even a single character (e.g. "X") can be used for a
reason
code if
this option is enabled. Because it does not know if you are
typing a
new reason description,
typing the first letter or two of an existing preset reason will
not
automatically jump down to the
limited list of presets...if you want to select one of these
reasons,
just use the down-arrow or click on
the item in the list of reasons.
You can also cause the program to jump to one of the preset
reasons
by typing the first letter then pressing the down-arrow.
For example, when you type P

and press down-arrow the program will jump to the first one that starts with P (assuming you have such a reason).

If you enter a reason in the field manually, it is stored with the transaction records, but is not automatically added to the list of reasons in the VOID-REASONS table.
Latest changes:
You can now specify a date range when exporting the transaction data via the FILE-->EXPORT/IMPORT TRANSACTION DATA-->EXPORT TRANSACTION DATA menu option. Click here to review the relevant updated pages of the user manual for more details.
Latest changes:
The receipt summary screen now has an extra button in the lower
left
corner
which allows you to change the font size of the text in the line
item
grid on the
screen. When you click on this button it will pop up a small
window
requesting a
new font size (in points ... settings between 6 and 16 or so are
normally appropriate).
The setting change will take effect immediately, so if you choose
a
size that is too
big or too small you can just change it again. The setting will
be
stored in the database
and restored to whatever value you set it to when you come back
to the
screen in the
future.
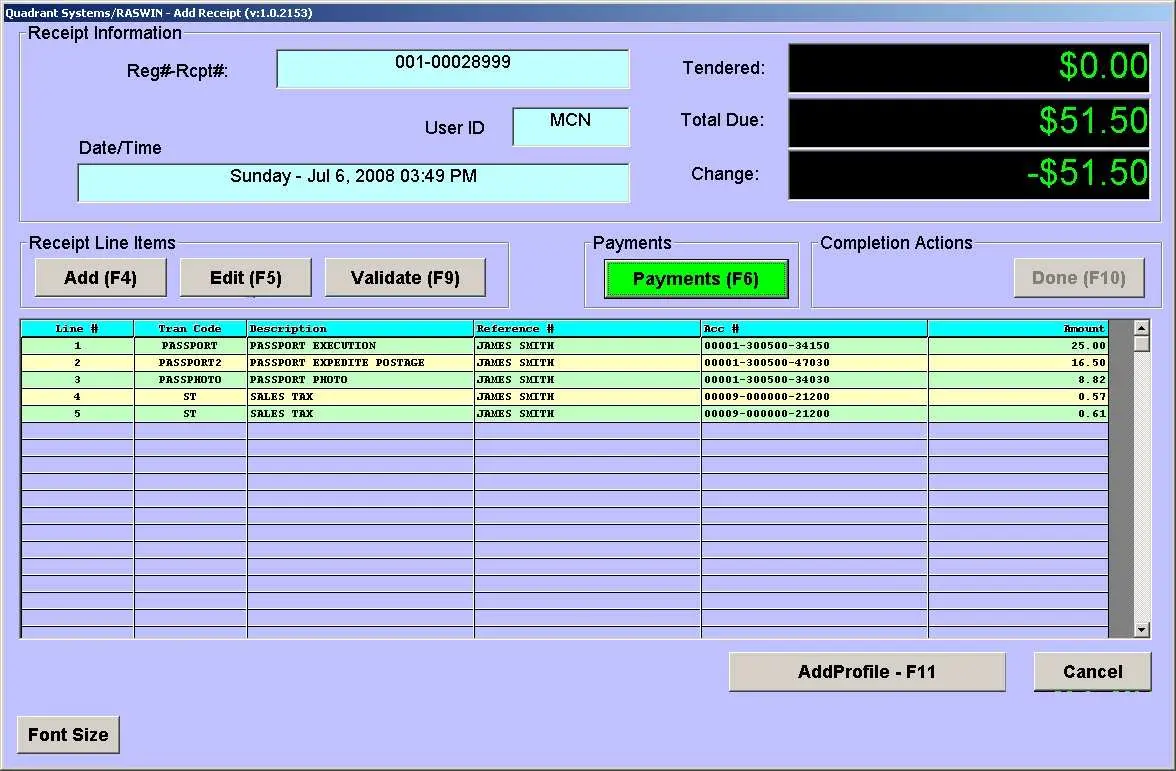

You can now activate an option that prevents the cashier from taking more in payments than is due (except for CASH). If this is turned on (see below) and the user tries to accept a payment amount for more than the current amount due on the receipt for any payment method other than CASH the system will display a warning and prevent the payment from being added. Here's an example.. amount due on the receipt is $51.50. If the user tries to take a check (or any other non-CASH method of payment) for more than that amount you will get the warning shown below when the ADD button is processed.
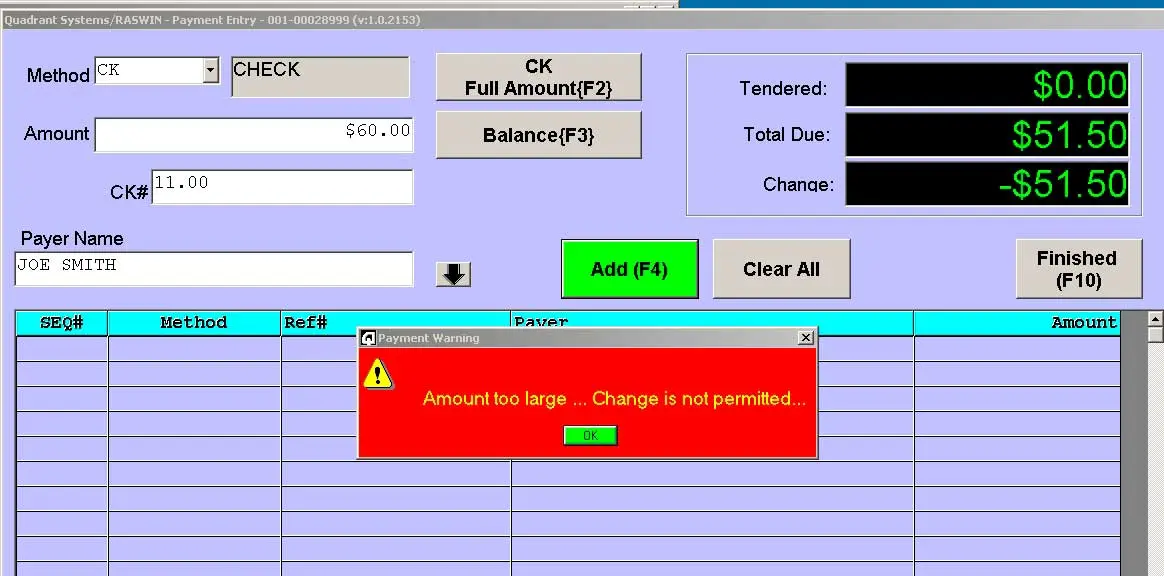
When you click OK the cursor will return to the payment amount field where you can type in an amount equal to or less than the balance due on the receipt. If another payment has already been tendered the amount of the maximum amount that can be tendered will be reduced appropriately.
By default, this feature is set so that it does not restrict the amount tendered on any payment type. If you want to activate it, you will need to adjust a setting in thePAYMENT OPTIONS table. The program will create the option automatically with the value set to YES, as shown below, the first time you go to the payment screen after updating to this version of the program.

After it is created, you can edit it via normal table maintenance, by changing the value to NO, and pressing ENTER to save the record.

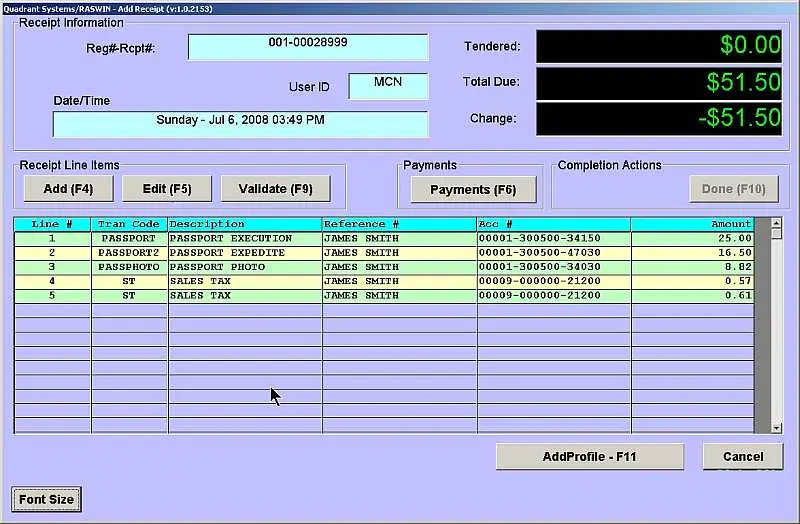
ThePROFILE TRANSACTION SCREEN has undergone several changes. First, a new column (REFNUM) has been added so that you can edit the reference number for EACH LINE separately. In prior versions this was not possible. When you first type in a Reference # and press {ENTER}, the value you entered will be set on each line of the profile, as shown in the following screen:

As with prior versions, the cursor will then position itself to the AMOUNT field on the first line on the profile.

However, you can move to the left and edit the individual reference numbers as needed, as shown above
These adjusted values will then be carried back to the receipt summary screen as they should be.
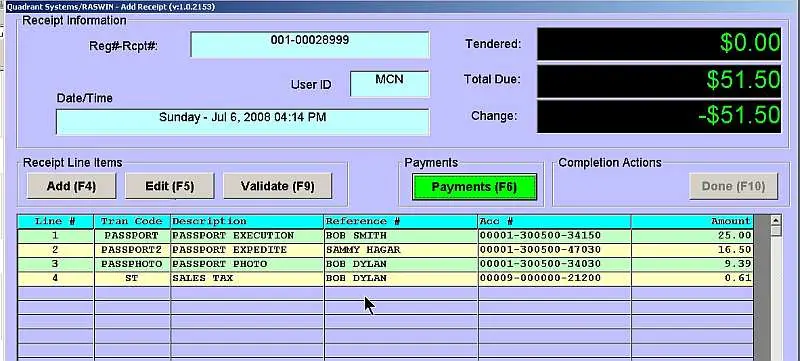
If you were paying attention to the screen samples in
theREFERENCE
NUMBER
discussion directly above, you may have noticed that the line for
the
PASSPORT PHOTO was
split to account for sales tax when the line items were brought
back
to the
receipt summary screen. This shows thatPROFILE
TRANSACTIONS now
handleAUTOMATIC
TRANSACTIONS ... which they previously did not do. The
implication of this is
that if you have some transactions on a profile that are linked
to the
AUTOTRANS
table you will need to adjust your profile so that it does not
present
the user with
the split items on the profile itself...that is, only the primary
item
on the transaction
that does a split should be included on the profile. The other
items
will automatically
be added to the receipt as they are added when you press the
{F4-Process} button.
The ability to do this has been a long requested feature and we
finally figured out
the way to do it. All the normal processing associated with
AUTOTRANS
type transactions
is supported ... splits, tax included or added on, additional
Line
items, etc.
A few changes:
A couple of years ago we set up the RASWIN program so that when it started it would load a complete list of all the Tran_Codes into an in-memory array so that it would not be necessary to hit the database each time it needed information about a transaction code. This speeds things up and reduces hundreds of trips to the database for information that the program needs to use during the course of doing receipts and reporting functions. At the time we did this we limited the size of the list to 1500 items, based on what we knew about the maximum number of Tran_Codes in use at any one site (around 1000 at the time). Recently a client reached the 1500 limit, so we have upped it to 2500. This should not affect anything you see or experience while using the program.
In much older versions of the program there was an option to prevent adding a payment for 'zero' dollars. At some point the option was removed .. we can't recall exactly when or why .. but one of our customers now says they need to be able to do it. We have therefore added an option to permit you to not allow these items...this will be found in the PAYMENTS options on table maintenance ... The setting is PERMIT-ZERO-DOLLAR-PAYMENTS. The default value is YES, so if you don't want to permit them, you will need to change it to NO.
One minor fix:
The open drawer function would work with the F10 key when the open Drawer icon on the main menu was grayed out. It would not open by clicking on the icon with the mouse, but it would open with the F10 key. The logic to prevent this has been moved in the correct place so that this no longer happens.
The'SET ACCOUNTING DATE FOR ALL REGISTERS IN DEPARTMENT XXX' was not working due to a logic error in the start of day screen. This has been corrected.
This adjustment in program logic described below applies only to the Quadrant Systems RASWIN installation at the Town of Groton, CT:
When entering UNIT FEE values for certain transactions related to
building permits
that are based on a 'base figure' (e.g., square footage, # of
units,
etc.) the program
used to use this value as the basis for calculating a final unit
price
using certain
calculations that followed rules defined for the particular
trancode.
The originally
entered value was not retained.
When the 'base figure' is entered the program proceeds as it did
before as far
as calculating the correct fee. No changes to the pricing logic
have
been made.
This has been modified to operate as follows:
Enter the value which will serve as the basis for the calculation in the UNIT FEE field, as before:
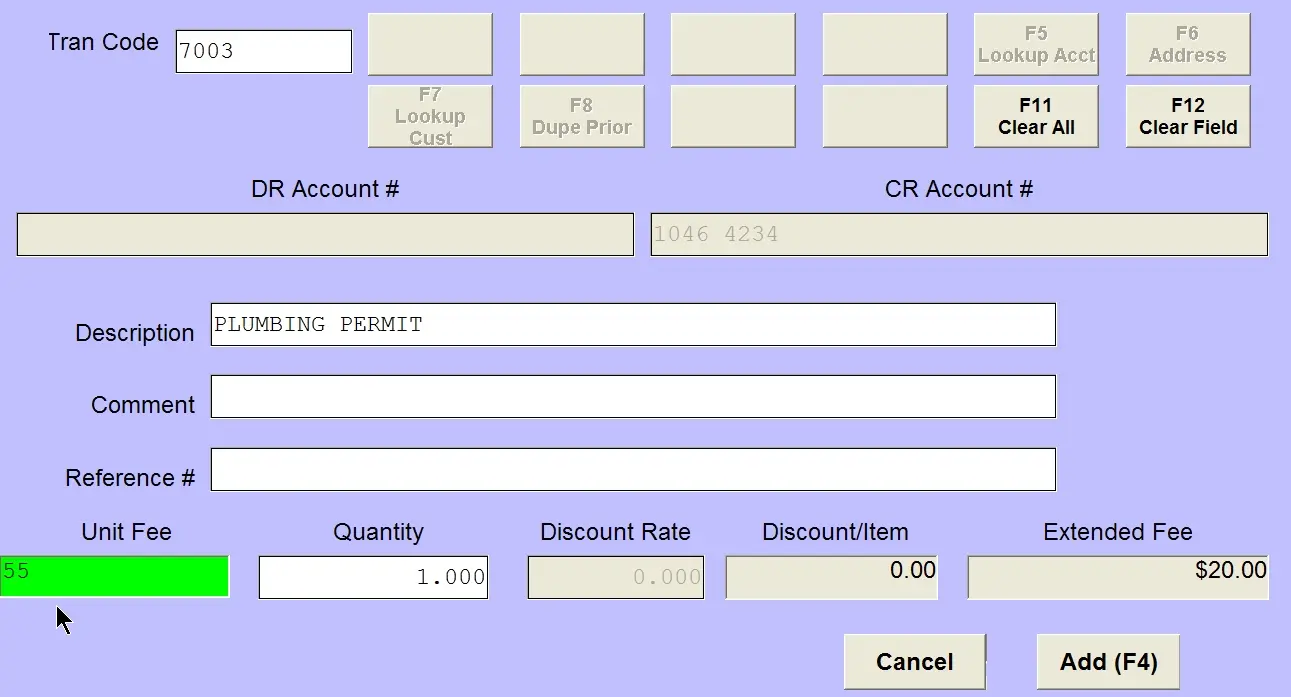
The 'base figure' is stored and copied to the COMMENT FIELD, as shown below. This is displayed AFTER the fee calculation is completed, which is done AFTER you exit the Quantity field.

There are two settings you need to make for this process to take effect.
ForEACH trancode that you wish to store the originally entered value in the COMMENT field, you need to make an entry in the USER_DATA table, which contains the TRAN_CODE and the words 'FEE-TO-COMMENT' in the USER_DATA_3 field, as shown in the two examples below:

If the entry for the USER_DATA is not made, the program will not 'remember' the Unit Fee value as described above.
The program can prefix a plain text phrase in front of the entered value, as shown in the example above. By default this text is set to "FEE BASE:". If you want to change this value, adjust the setting in the RECEIPT-OPTIONS table, as shown below:

The "FEE BASE:" text_value will be set automatically by the program the first time this logic is executed. If you don't want any prefix at all, use table maintenance to set the text_value to 'NONE'. Any other value will be prefixed before the numeric value you enter in the unit field and then the resulting text string will be stored in the COMMENT field.
When printing a void receipt, the program now includes information about who voided the receipt, when, and why at the top and bottom of the receipt just below the old "VOID VOID VOID" messages.
A few extra logging statements were added to the batch reports controller function to help track the source of an error one user has been having. This will not affect anything you see or need to do when using the batch reports function.
The RELEASE NOTES Files have been changed to HTML format (instead of the old plain TEXT format. These files are located in the c:\program files\quadrant\raswin\qsi directory. The program has been modified to cause them to be displayed using your default browser when they are selected from the:
   MAIN MENU-->
      HELP-->
         NOTES
menu option.
This version implements the option to select the Department Code when creating the Quick Tran Codes listing option. By default the selected department will be the one the currently logged in cashier is assigned to. If you want to print a list of codes for another department it can be selected from a drop down list...and at the very bottom of the list there is an entry for "ALL DEPARTMENTS".
A minor change to the REPORTS-Quick Table Lister option was made to suppress the inclusion of trancodes that have expired (via the EXPIRES-DATE setting in the Transaction Codes Table). There is now a small check-box at the bottom of the 'Quick Tran Codes Listing' screen that you can check to cause the codes that have expired (expiration date is less than the current date) to print. If this box is left unchecked it will not include these older trancodes in the list.
In the next version we will add an option to specify a list of codes that are linked to a specific departments as opposed to the current version which lists all codes (except as noted above).
A change to the initial connection to the database was made for the two screens that are used for ADDRESS ENTRY functions. This should cause an error message that appeared under some conditions when using a test database vs. the production database.
There was an error related to the security level set on trancodes that was causing this field not be read properly when the program loaded the list of codes into memory for quick access. It has been corrected so the value set in the trancodes table will be properly interpreted.
In the
   File-->
      Export/Import Transaction Data-->
          External System Transaction Import
menu option there was a bug in the logic that reads the values of the starting and ending positions for the COMMENT field that was causing the end position to be improperly calculated. This has been corrected in this version. If you were using the import option but were not importing a comment value this would not have affected you in any way.
A minor change to some internal logic was made to make accessing the details of the TRANCODES table more efficient. The older database VIEW that was used to perform this function has been bypassed to speed up the access.
While processing Credit Cards it was previously possible to have the payer name end up being set to a size that was larger than the database field could handle. This resulted in a error when trying to insert payment records. This has been corrected in this release so that regardless of what is manually entered by the user or scanned from the credit card, the field size for the credit card name (30 bytes) can not be exceeded.
On the CASH RECAP REPORT there was a error that would result in the total cash tendered being wrong in the 'Totals By Payment Method' section of the report if a receipt had multiple payments and change due.
What would happen is that the change due on those receipts would be counted multiple times (as many times as there are payments on the receipt[s]).
This has been corrected to insure that in these cases the change from each receipt is only included once.
The the other sections of the report that involved showing total cash (e.g., detail payment listings) were not affected by this error and showed the correct values.
Recent implementations of MS SQL Server have case sensitive user ID's and PASSSWORDS. In some cases this would cause the ODBC connections used by the RASWIN program to fail if the case of the user ID's used by the RASWIN application, does not match what is in the SQL database.
We have therefore adjusted the RASWIN program to ALLWAYS use all UPPER CASE user ID and PASSWORD settings, so it may be necessary to adjust the ones in your SQL Database if you migrate from an older version of SQL that was not case sensitive (and had lower case values for USER ID's and PASSWORDS) to a newer version that is case sensitive.
Normally when we set up the users and passwords in SQL we default the USER ID's and PASSWORDS to upper case. However, in some cases, when additional workstations are added to an existing installation or in the case of some on-line interfaces using existing 3rd party databases, we can not always control the case of USER ID's and PASSWORDS as defined in the database. These may require adjustment to match what the RASWIN app will be using.
The option to send transaction data files to Quadrant Support VIA FTP was not working correctly. This has been fixed.
This option is found on the
   File ->
      Export/Import Transaction Data ->
          Export Transaction Data
Menu option. If the "Send" box is checked it will now be able to connect to our FTP server and upload the data for the selected date (assuming your outbound FTP ports are not blocked by your network).