Section 8
End of Day Processing
The END OF DAY PROCESS consists of counting the contents of your
cash drawer,
running the reports you need to help in balancing the cash drawer
(see the reports section for more
information regarding this task), and creating the export file to
upload to your host system for posting to your main accounting system(s),
such as your general ledger, and whatever sub-systems that may be impacted
by your cash receipting activity (for example, Utility Accounts
Receivable, Parking tickets, tax sub-systems, etc.)
You may also need to
Export/Import
transactions from multiple registers if your systems are not connected
to the same database.
BALANCE SCREEN
Select
main menu➔
file➔
Balance

There are a number of entry boxes in which you can post the counts for
coins, rolled coins, bills, and the totals for your other methods of
payment such as checks, money orders, etc. Each time the cursor advances
to another entry field the program will recalculate the totals for all
boxes entered.
Note: You can adjust the names of the 14 fields in the two right
columns of numbers using values in the
Misc Parameters Table.
There are entry boxes for coins, rolls, and bills, etc. You can use the
arrow keys to cursor directly to that field, or you can simply press the
tab key to move from one field to
the next, or the standard
shift+
tab combination to move backwards.
When you are done entering the values, the program will automatically
save your entered values to a small data file. This can be reloaded on
subsequent runs of the program so that you don't have to re-enter your
values again if only minor changes are required. The Load
Data option restores the settings that were saved the last time the
balance program was performed. The program does not re-load the values
unless you ask it to do so.
You can also elect to clear all the entry boxes at once with the
Clear All button or by pressing
f12.
Lastly, using the
Print Report button, you can
cause the program to print a short report listing your entered values on the
receipt printer. This serves as your balance report. The values on this
report be compared to the other report totals (e.g,. CASH RECAP) to
determine if you are in balance after all posting is completed for the day.
CREATE UPLOAD DATA FILE
Select
main menu➔
file➔
Create Upload Data File
When you do this, the following screen will be displayed:

The system will assume that you want to export and upload the data for the
currently set
accounting date, which was set via the
Start of Day processing screen.
However, you can select another date or a range of dates using the
drop down calendar boxes located at the top-left corner of the screen.
You can select either a single
accounting date or a
range of dates, or a single
calendar date or a range
of dates combination of the two.
For most users, the
Accounting Date option work best, as most of the
time transactions are grouped for deposit by
Accounting Date.
The Starting Date must be less than or the same as the
Ending
Date.
If the settings are correct simply click the
Create File
button and the program will read the transactions for the date
range specified and export the data to file name indicated.
Each time the program runs it creates a new data file, and will
replace any existing file of the same name. If the file already exists
(from a previous execution of the program) a
warning message will be displayed.
The file name and location can include a drive
letter and path which must be a valid location to which you access
privileges on your local drive or network.
NOTE: Reformatting the Output File
Many of our customers have import interfaces that require the export file
to be in a specific format, as opposed to the generic format created
directly by the
initial export process described above. To address this issue, RASWIN
provides a special
module that reads the generic output file
and converts to the format required. This module can be run
by creating a
setting in the
MISCPARMS table that tells the export module
what custom format is required. If your system is set to run
the RE-FORMATTER module, you will see the following screen
after your have created the initial export file:
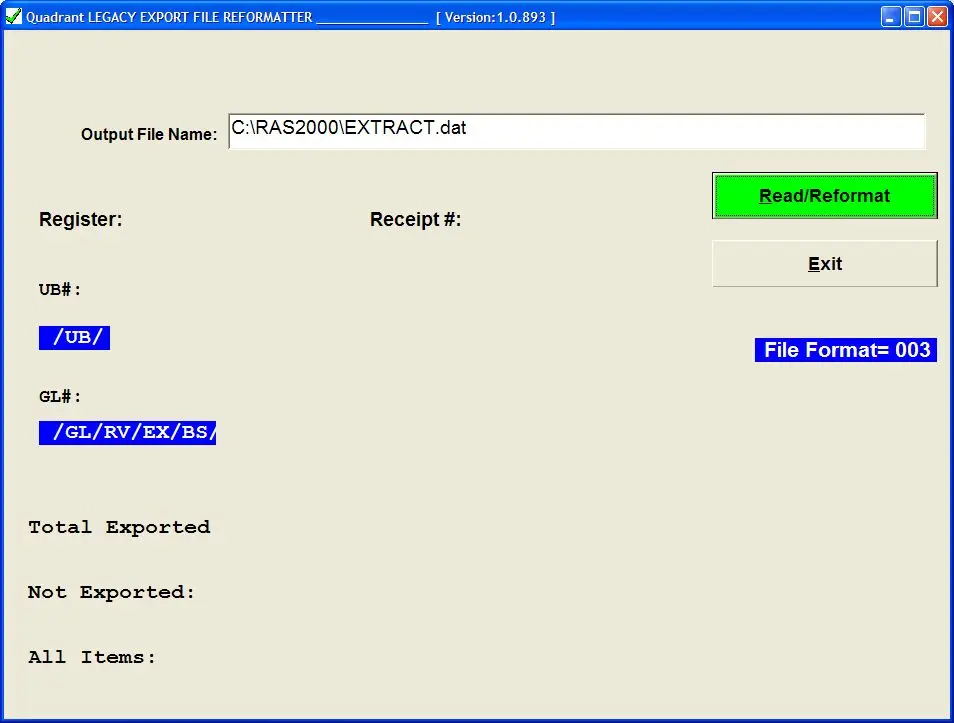
All you need to
do
is click on the green read/reformat button and the LEGACY
FORMATTER module will read the file created by the previous step
and create an output file that is ready for import into your
existing interfaces. The process takes just few seconds.
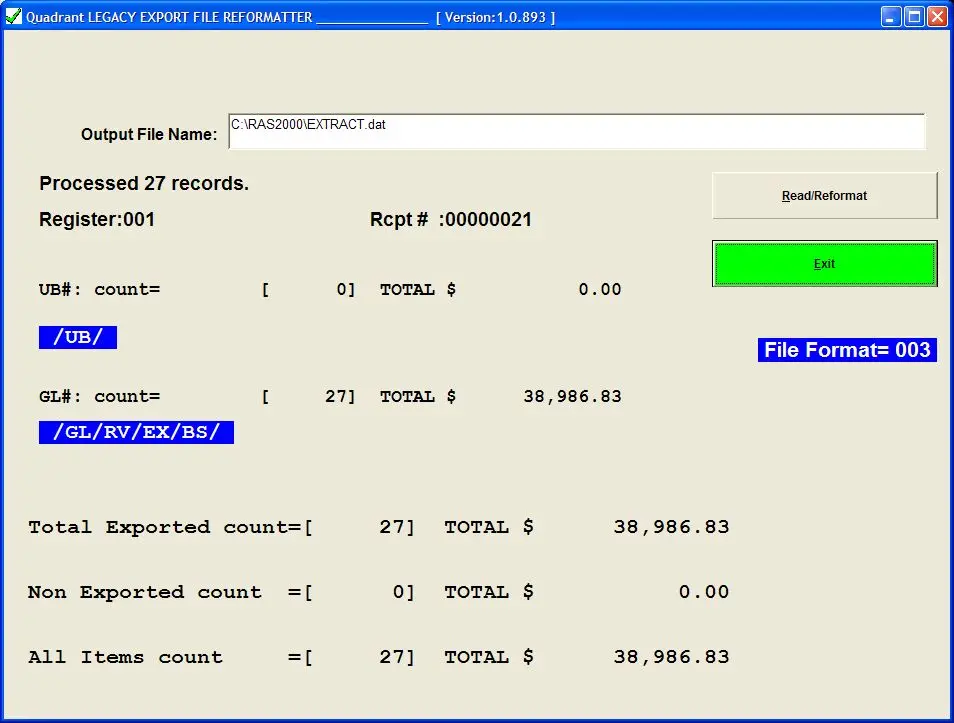
After the process is completed, RASWIN will display a summary
of the export showing the number of records in the various categories
and dollar totals. If any records were not included in the
as a result of settings you have established, the count and dollar
total for these items will also be shown.
Export Transaction Data
Select
main menu➔
file➔
Export/Import Transaction Data
If you are exporting data, the following screen will be
displayed:
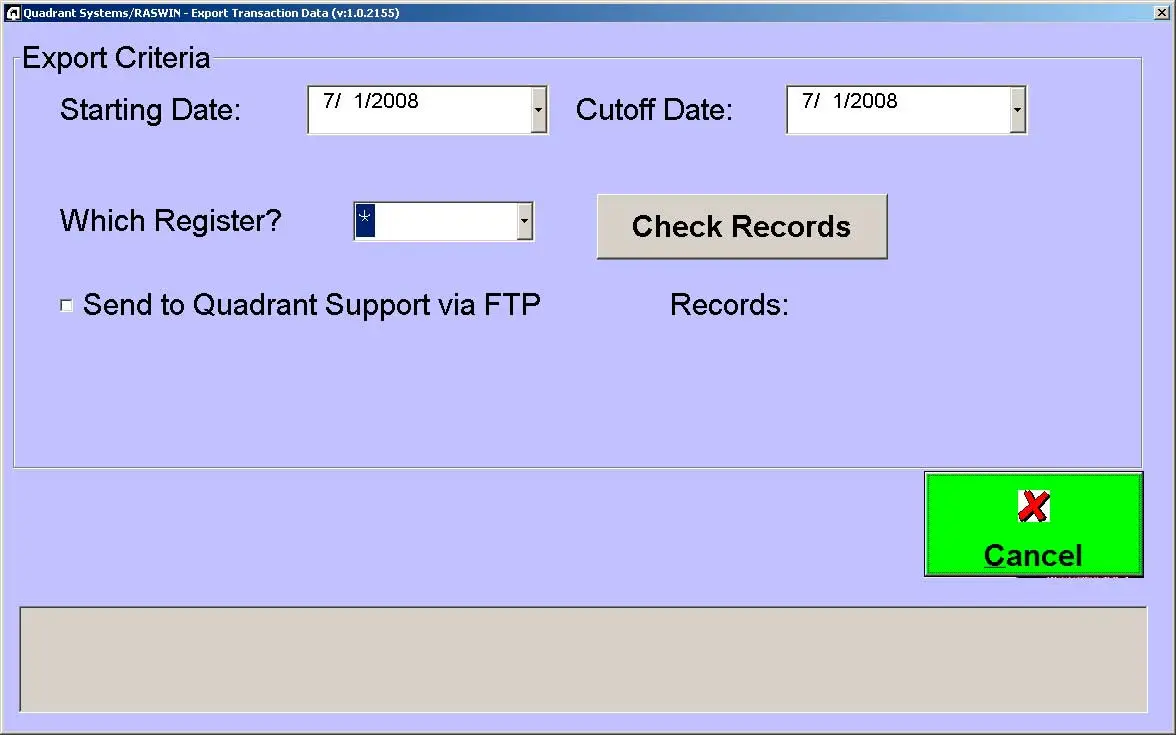
The
dates will default to the currently set accounting date, and
register
number will default to "*" (all) another register number from the
drop
down list. After selecting a date range and clicking on the 'Check
Records' button RASWIN will verify the number of records that meet
these
criteria and display a count of how many records match.
Note: You can adjust the date range and register number if
required.
If there are matching records found, you will be able to
click the
EXPORT command button. If there are not any records, then you
will not be able to do the EXPORT until the you specify a date for
wh
ich
you have transactions for the register number specified.
When you click the EXPORT button the program will
create a
file for the register number/date combination you have specified.
You
will then see the following screen which will confirm that the
records
were created.

The file will be created in the
C:\programdata\quadrant\exports directory. The file
name
will
include your location name and the date range (starting and ending
data). It is a SQL script that can be run to import the data into
another database.
Import Transaction Data
RASWIN offers several options for importing
transaction
data from external sources. In some cases, Quadrant will create a
custom
interface program to access and format your data so it can be properly
imported into the RASWIN database. In others,
an external system
will generate a file that RASWIN can access us
ing
simple setup steps to allow the data to be imported and turned into
RASWIN receipts.
To start the import process, select
main menu➔
file➔
export/import transaction data
It will display a sub-menu which contains several options
related to importing data. These are shown in the screen shot below.

There are four basic transaction data import options. Each is described
below:
Reformat Import Data
This option
permits
you to execute an external program that will export or read data
from your host application and format it into a file that can be
read by RASWIN. In some cases this is a
program
you have developed, and in others it is a program developed by
Quadrant Systems. These are used when the external data format is
so not directly compatible with the data format required by the RASWIN
import process that it is more practical to have this done by an
external module rather than incorporated directly into
RASWIN.
The goal is to get the data into a format that the standard
import routines included in RASWIN can handle
the data easily. Examples of such 'simplification' steps include
converting from a CSV or TAB delimited files to a FIXED RECORD
layout, removal of batch headers and trailer records, converting
formats of data (e.g., dates from 'non-standard' to a valid date
format, etc.)
Most modern software applications are capable of generating an export file
that does not
need such reformatting. However, sometimes you have no control over what
your system is able to produce or an existing export format is easier to use
or can not been changed for some reason.
After the reformat step is done, if necessary, you will then proceed to
the actual import in to the RASWIN database, described below.
External System Transaction Import
This menu option is the one most often used to import data from external
systems such as lockbox export files, etc.
RASWIN permits you to define any number of transaction import 'profiles' via
the
IMPORT_DEFS table.
Once
a profile is defined, it can be used over and over again as long as the file
structure of the import file does not change. When you select this option
the program will display the import screen. It requires just a few steps to
read and import data from these files.

First you must select the Import Profile that relates to the data
you wish to import. This is done by choosing the option you want
to
us from the list near the top-left side of the screen.
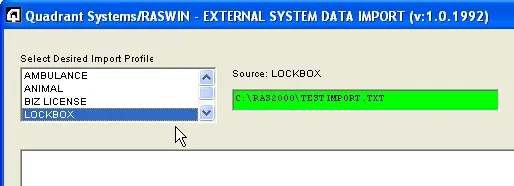
When you select one of the entries the program will load the import profile
that defines the import format from the RASWIN database. The profile stores
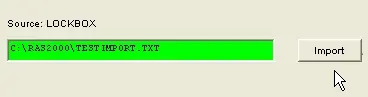
the expected import file name and looks to see if the file exists. If it is
found, the file name box color will be green, indicating that the file is
present and ready to be imported.
If it is not found the name box will be red, as shown below.
This means the file was not found and obviously can't be imported.
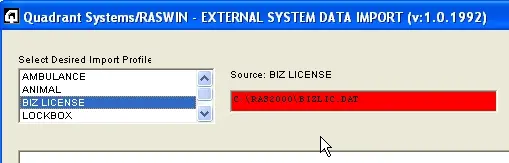
If the file is
not present, or the pre-defined name in the profile is incorrect,
you can manually type in a file name in the file name box, or double click
in the file name box to browse to the file you will be importing. Once
RASWIN is able to locate the file
the box will turn green, indicating the file is found.
Click on the
PREVIEW
button to have RASWIN read the file and determine if all the values are
correct.
It will display a record count and dollar total that you
can compare to the totals you expected to receive from you external system.
If any of the import trancodes are payment methods are invalid, RASWIN will
display error message indicating what is wrong. These must be corrected
before the data can be imported.
If everything is validated as being correct, the
import button
will be activated (instead of being grayed out).
At this point
all
you need to do is click on the
import button and
the program will
read the data from the file and add each item in the file to
the
RASWIN database as a new receipt. The time this will take
depends on how many items need to be imported, but it is a fairly
fast process. It typically processes about 5 to 10 items per
second. As each item is processed the values showing the number of items
being read is updated along with the total dollars read from the
import file.